Symptoms of a bad oxygen sensor
Oxygen sensor failure leads to increased fuel consumption, reduced vehicle performance, unstable engine idling, and increased exhaust emissions. Usually, the causes of oxygen concentration sensor failure are mechanical damage, rupture of the electric (signal) circuit, and sensitive part pollution of the sensor by fuel combustion products. In some cases, the Check Engine light will activate on the dashboard, and the diagnostic will show oxygen sensor fault code p0130 or p0141. It is possible to use a car with a faulty oxygen sensor, but it will lead to the above problems.
That the sensor is faulty can be noticed in most cases only after warming up the engine (oxygen sensor begins to work in conditions of increased to +300 ° C temperature in the exhaust system). Therefore, if after warming up the engine starts working unstably at idle rpm, and the onboard computer on the panel shows increased fuel consumption, you should pay attention to the presence of other symptoms indicating a faulty O2 sensor.
Signs Your Vehicle has a Bad O2 Sensor
Failure of the lambda sensor is usually accompanied by the following external symptoms:
Bad Oxygen Sensor Symptoms and Dangers: video
- Deterioration of traction and decreased dynamic performance of the vehicle.
- Unstable idling. RPM values may jump and drop below the optimal ones. In the most critical case, the car will not keep idling at all and will simply stall without the driver's accelerating.
- Increase in fuel consumption. Usually, the overconsumption is insignificant, but it can be defined with the software measurement.
- Increase of toxicity of exhaust. The exhaust gases become opaque and have a grayish or bluish tint and a harsher, fuel, smell.
The above-listed symptoms of a bad oxygen sensor are not always such, they may indicate other engine or other car systems failure. Therefore, in order to determine if the oxygen sensor is malfunctioning, you need some checks using first of all a diagnostic scanner and a multimeter to check the lambda signals (control and heating circuit).
As a rule, oxygen sensor wiring problems are clearly detected by the electronic control unit. At the same time errors are formed in its memory, for example, oxygen sensor fault codes p0130, p0135, p0136, p0141 and others. Error codes will differ from the problem and from which sensor there is no signal to the ECU. In any case, it is necessary to check the sensor circuit (check for voltage and continuity of individual wires) and look at the graph of operation (using an oscilloscope or diagnostic program).
What causes an oxygen sensor to fail?
In most cases, the oxygen lambda works about 100 thousand km without failure, but there are reasons that significantly reduce its life and lead to failure.
Breakage of oxygen sensor supply and signal wires
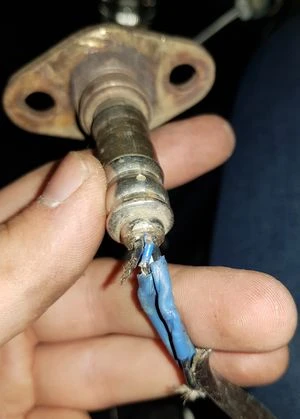
- Failure of the oxygen sensor circuit. It can be expressed in different ways. It can be complete breakage of supply and/or signal wires. It is possible that the heating circuit is damaged. In this case, the lambda probe will not work until the exhaust gases warm it up to operating temperature. The insulation on the wires may be damaged. In this case, there is a short circuit.
- Short circuit of the sensor. In this case, it completely fails and, accordingly, does not give any signals. In this case, the problem can only be eliminated by replacing it.
- Contamination of the sensor with products of fuel combustion. In the process of operation, the oxygen sensor gradually becomes contaminated for natural reasons, and over time it may stop transmitting correct information. For this reason, car manufacturers recommend periodically replacing the sensor with a new one, giving preference to the original, as the universal lambda does not always show the information correctly. However, there are several ways of cleaning, both with the use of special fluids and simply by working the engine at increased speed for a long time (there will be self-cleaning).
- Thermal overloads. This usually occurs due to problems with the ignition, in particular, interruptions with it. In such conditions, the sensor works at temperatures critical for it, which reduces its overall life and gradually puts it out of operation.
- Mechanical damage to the sensor. They can occur with careless repair work, driving off-road, or bumps in accidents.
- Repeated unsuccessful attempts to start the engine. In this case, unburned fuel accumulates in the engine and, in particular, in the exhaust manifold.
- Leaks in the exhaust system. For example, the gasket between the manifold and the catalytic converter may burn through.
Pay attention that oxygen sensor condition largely depends on the condition of other engine elements. Thus, the following factors considerably reduce the lambda probe service life: bad condition of oil rings, antifreeze penetration into oil (cylinders), and enriched fuel-air mixture. If the amount of carbon dioxide is about 0.1...0.3%, when the lambda probe fails, the corresponding value increases to 3...7%.
How are car sensors diagnosed?
There are a number of methods to check the condition of the lambda sensor and its supply/signaling circuits.
First of all, to diagnose whether the oxygen sensor in the car is working or not:
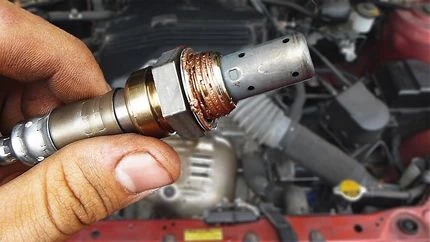
 Click to enlarge image
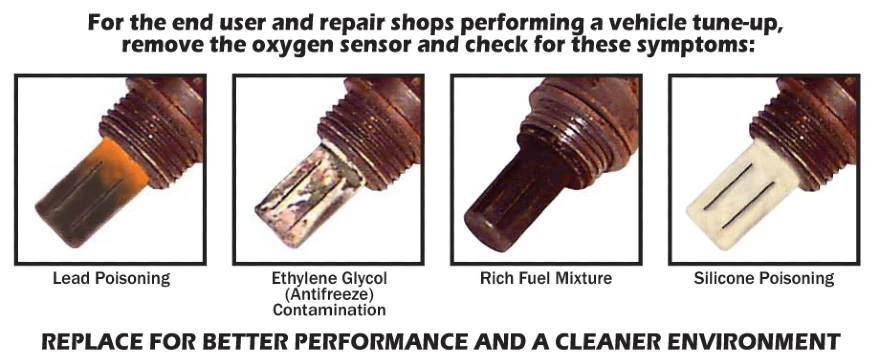
- Evaluate the amount of soot on the probe tube. If it is too much — the sensor will not work properly.
- Determine the color of deposits. If there are white or gray deposits on the sensor element, it means that fuel or oil additives are used. They have a negative effect on the lambda probe operation. If there are shiny deposits on the probe tube, it means that there is a lot of lead in the fuel used, and it is better to refrain from using such gasoline.
- You can try to clean the soot, but it is not always possible.
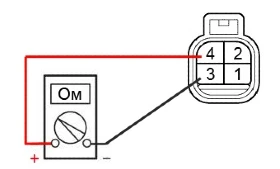
- Check the integrity of the wiring with a multimeter. Depending on the model of the particular sensor, it may have from two to five wires. One of them will be the signal and the rest will be the power wires, including those to power the heater elements. You will need a digital multimeter capable of measuring DC voltage and resistance to perform the test procedure.
- It makes sense to check the resistance of the heater sensor. In different models of lambda probe, it will be in the range from 2 to 14 ohms. The supply voltage value should be about 10.5...12 volts. In the process of checking it is also necessary to check the integrity of all the wires to the sensor, as well as the value of their insulation resistance (both in pairs with each other, and each to the «ground»).
Oxygen sensor heater check
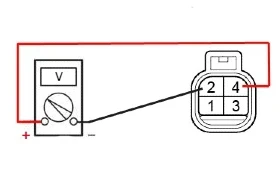
Checking the power supply to the sensor heater
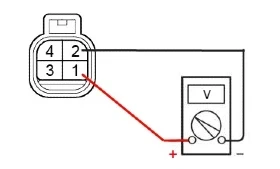
Checking the sensor signal voltage
Pay attention that the normal operation of the oxygen sensor is possible only at its normal operating temperature of +300°C...+400°C. This is because only under these conditions does the zirconium electrolyte applied to the sensitive element of the sensor become a conductor of electric current. Also at this temperature, the difference between atmospheric oxygen and oxygen in the exhaust pipe will cause an electric current to appear on the sensor electrodes, which will be transmitted to the electronic engine control unit.
The most accurate way to determine the malfunction of the oxygen concentration sensor will be an oscilloscope. It is not necessary to use a professional device, you can take a waveform using a simulator program on a laptop or other gadget.
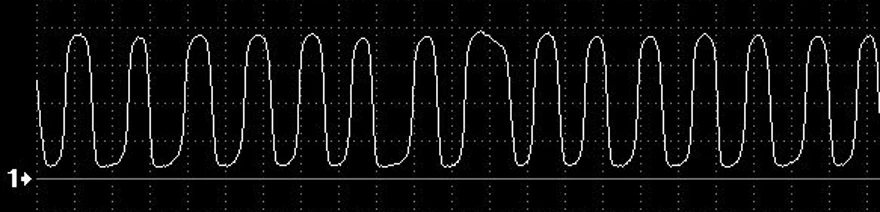
Diagram of proper operation of the oxygen sensor
The first diagram in this section shows a diagram of the correct oxygen sensor operation. In this case, there is a signal that looks like a steady sine wave on the signal wire. The sine wave in this case means that the parameter monitored by the sensor (the amount of oxygen in the exhaust gases) is within the permissible limits, and it is simply being checked continuously and periodically.
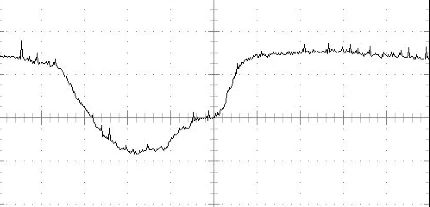
Below are the graphs corresponding to a heavily contaminated sensor, the vehicle engine using a lean fuel mixture, a rich mixture, as well as a lean mixture. The smooth lines in the graphs mean that the parameter being monitored is out of the allowable limits in one direction or the other.
 Operating diagram of a heavily contaminated oxygen sensor
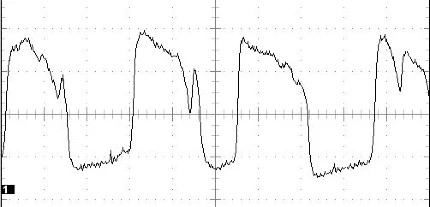 Oxygen sensor graph on a lean fuel mixture
 Oxygen sensor graph on an enriched fuel mixture
 Oxygen sensor graph on a low fuel mixture
How to fix the oxygen sensor
If after checking that the cause of the wiring showed that the problem will be solved by replacing the wiring harness or a connector wire, but the lack of signal from the sensor itself often indicates the need to replace the oxygen sensor for a new one, but before you buy a new lambda can use one of the following methods.
Temporary fix for bad o2 sensor
First of all, try cleaning the oxygen sensor. It is necessary to clean the heated element from the fouling (applicable when the oxygen sensor heater malfunctions). This method requires access to the sensitive ceramic part of the device, which is hidden behind the protective cap. This cap can be removed with a thin file, with which you need to make incisions in the area of the base of the sensor. If it is not possible to remove the cap completely, it is allowed to make small windows of about 5 mm. For further work, about 100 ml of orthophosphoric acid or rust converter is needed.
The restoration procedure is performed according to the following algorithm:

FIX O2 Sensor For FREE: video
- Pour 100 ml of orthophosphoric acid into a glass container.
- Dip the ceramic element of the sensor into the acid. Do not dip the sensor into the acid completely! Then wait approx. 20 minutes so that the acid dissolves the soot.
- Remove the sensor and rinse it with running water from the faucet and then let it dry.
Sometimes it can take up to eight hours to clean a sensor using this method because if it is not possible to clean the soot the first time, it makes sense to repeat the process two or more times, and you can use a brush to perform mechanical treatment of the surface. Instead of a brush, you can use a toothbrush.
If you do not have the opportunity to use this method, you can try and simply burn off the carbon deposits (similar to the self-cleaning procedure). To perform cleaning of the oxygen sensor by the second method, apart from the same orthophosphoric acid, you will also need a gas burner (as an option to use a home gas stove). The algorithm of how can an oxygen sensor be cleaned is as follows:
- Dip the sensitive ceramic element of the oxygen sensor in the acid, wetting it abundantly.
- Take the sensor with the pliers from the opposite side of the element and bring it to the burning burner.
- The acid on the sensor will boil and a greenish salt will form on its surface. However, at the same time soot will be removed from it.
Repeat the described procedure several times.
FAQ:
-
Can you drive your car with a bad O2 sensor?
You can continue driving, but it's not safe for your car and the environment. When the O2 sensor failure occurs, the car starts to provide an enriched mixture to the engine.
-
Can an O2 sensor fix itself?
A broken O2 Sensor cannot be repaired, it must be replaced and of course, it can't fix itself.
-
How much does it cost to replace an O2 sensor?
A couple of hundred dollars, but the cost of repair will depend on what problems with the O2 sensor have occurred. Broken wire: $100-$200 with an average cost of $145. O2 sensor replacement that takes literally 10 minutes: $200-$300, including parts and labor.
